Art Break! - Engagement Card for S and J
This will be a quick one since I don't have progress pictures (sorry).
I used a purple background (a favourite colour of the couple).
The flowers were varied as I wanted it to look like a botanical garden. I drew them with pencil then coloured them with water colour paint.
The two foxes (our couple) are also pencil and water colour.
I did two gold rings with acrylic paint and the gems on the engagement ring (in the style of her engagement ring) are arranged on silver foil paper.
Showing posts with label flowers. Show all posts
Sunday, 5 December 2021
Labels:
Art Break!,
Card,
engagement,
flowers,
fox,
pencil,
quick,
ring,
rings,
water colour
Friday, 30 March 2018
Art Break! - Embroidery
A little while ago I was looking at some historical pieces of embroidery with my friend S.
She mentioned how it was sad that it is a dying art.
So why don't I give it a shot?
I got a hoop, some fabric, different coloured floss, and got started.
First a poppy.
Then an immortelle.
A pink rose.
A snowdrop.
I already broke a needle, but I have plenty more XD
Lavender.
Progress so far:
A cherry blossom.
Blue lotus.
A violet,
I will post more as I complete more. :D
A little while ago I was looking at some historical pieces of embroidery with my friend S.
She mentioned how it was sad that it is a dying art.
So why don't I give it a shot?
I got a hoop, some fabric, different coloured floss, and got started.
First a poppy.
Then an immortelle.
A pink rose.
A snowdrop.
I already broke a needle, but I have plenty more XD
Forget-me-not.
Lavender.
Progress so far:
A cherry blossom.
Blue lotus.
A violet,
![]() |
| In a new little hoop! |
I will post more as I complete more. :D
Labels:
Art break,
blue lotus,
cherry blossom,
embroidery,
flowers,
forget-me-not,
immortelle,
lavender,
poppy,
rose,
snowdrop,
violet
Tuesday, 8 August 2017
Art Break - Fascinator for B
B really wants a fascinator, so I offered to make her one.
Her favourite colour is purple, so that will be our starting point.
Instead of the basic 'feathers and flowers' form, I wanted to take it a step further and make it a 'Nature' themed facinator!
I got fake flowers, a headband, a foam bird, and feathers from the shops today.
And I ordered some fake berries online.
Our bird isn't purple to begin with, but we can change that with some gently applied acrylic paint.
To make some ribbon shapes, I was trying to set it with watered down glue.
But I didn't like the results.
So I glued some florist wire to some fresh ribbon.
I also glued a ring of ribbon to the headband, to make a base for our decorations.
With our florist wire attached, I shaped the ribbon and glued it.
I then attached it to the head band.
I started working on a nest made of feathers.
I then attached the bird and nest to the headband. You can start to see it come together now.
I got some styrofoam eggs.
Painted them light purple.
Then added some dark purple spots.
I then glued them into the nest.
I added flowers and berries around the nest.
I'm really happy with how it turned out!
B really wants a fascinator, so I offered to make her one.
Her favourite colour is purple, so that will be our starting point.
Instead of the basic 'feathers and flowers' form, I wanted to take it a step further and make it a 'Nature' themed facinator!
I got fake flowers, a headband, a foam bird, and feathers from the shops today.
And I ordered some fake berries online.
Our bird isn't purple to begin with, but we can change that with some gently applied acrylic paint.
![]() |
| At the start. |
![]() |
| Add some lilac paint. |
![]() |
| And some violet! |
To make some ribbon shapes, I was trying to set it with watered down glue.
But I didn't like the results.
So I glued some florist wire to some fresh ribbon.
I also glued a ring of ribbon to the headband, to make a base for our decorations.
With our florist wire attached, I shaped the ribbon and glued it.
![]() |
| I wanted a dramatic heart shape. |
I then attached it to the head band.
I started working on a nest made of feathers.
![]() |
| It will make sense soon! |
I then attached the bird and nest to the headband. You can start to see it come together now.
I got some styrofoam eggs.
Painted them light purple.
Then added some dark purple spots.
I then glued them into the nest.
I added flowers and berries around the nest.
I'm really happy with how it turned out!
Labels:
acrylic paint,
Art break,
B,
berries,
bird,
birthday gift,
fascinator,
feathers,
flowers,
headband,
nature,
purple
Monday, 13 June 2016
Brace yourself, this is a big one!
I had the idea a little while a go (while doped up on Endone for the nerve pain) that I should make a little house for the fairies to live it.
It should be waterproof, have a solar light, windows with 'glass', and a functional door.
Then as I was browsing an art shop (then on codeine) I spied this:
It was a sign!
So I quickly decided on a colour scheme. Cream (antique white) for the outer walls and inner roof, wisteria for the inner walls, and violet for the outer roof/ window sills/ accessories.
The first step was to paint it, which required up to 3 coats on some pieces and could only be done one side at a time (for obvious reasons).
![]() |
| Recycling the magazines! |
To fit a solar light to the roof, I needed a hole. I cut this out using a scalpel because I'm a derp who has never done woodwork before.
It worked well but broke the tip of my blade (good thing I have more).
For the windows, I cut some plastic into squares.
![]() |
| Easy to see! |
To brighten the light a bit, I painted the surrounding plastic with white paint then gold glitter.
![]() |
| Almost looks happy :) |
All of the wood was sprayed with clear varnish on both sides, to protect it a bit more.
All the components were hot glued together, the glue sealing up any cracks. I also added a mirror on the back wall (inside obviously).
![]() |
| Light off. |
![]() |
| Light on!!! |
The roof was also given a plastic cover to protect it from rain.
![]() |
| Plastic yet to be trimmed. |
With the door I got one from online and had to cut it down a bit to fit the house.
It didn't have any handles so I added some using these 'cover buttons'. I don't know what they are really for, but I also used some to make a few mushrooms!
Then I painted the door dark purple.
And then varnished it.
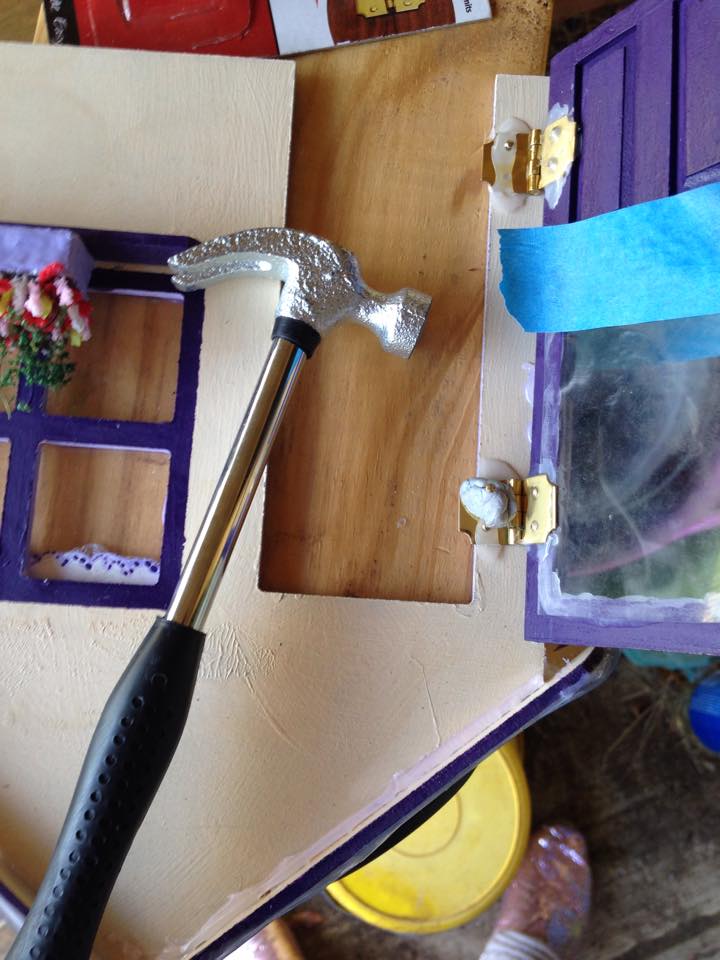
To attach it, I had these wee little hinges. I first glued them in place then hammered in some tiny nails. To hold the nails for hammering, I used blu-tac.
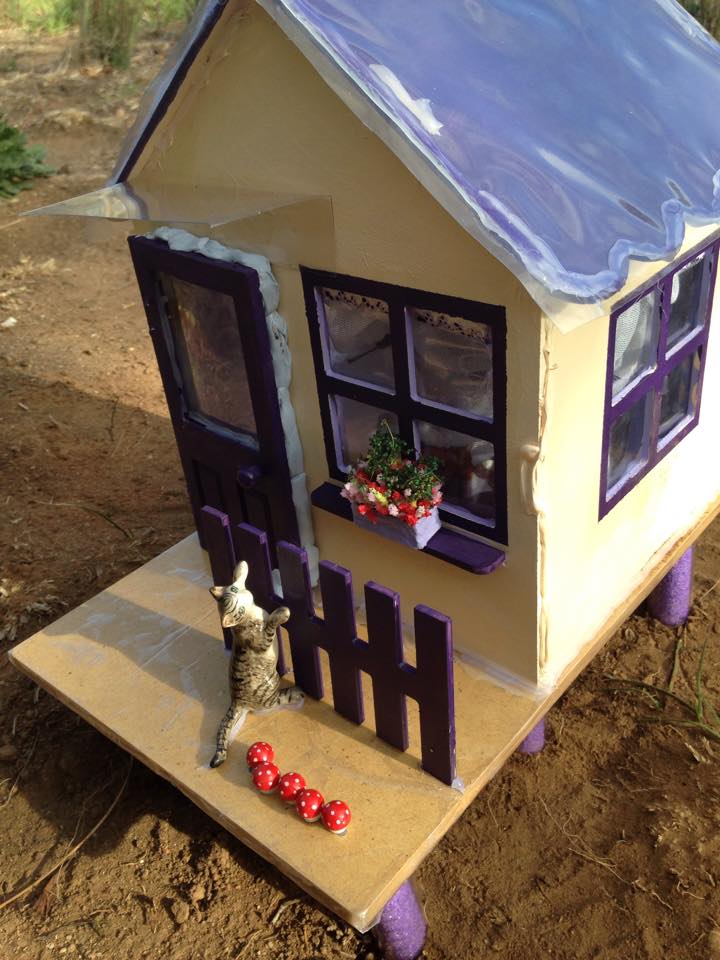
To protect the inside of the house, I ended up blu-tac-ing the door closed so it wouldn't get bugs in it. I put a clear plastic veranda over the door to protect it even more.
![]() |
| Mmmm, blurry! |
To keep it off the ground and keep it dry, I popped it onto these tubes with sand (weight) in them.
Finally we pop a chair inside for any visiting fairies and a kitteh outside.
Verdict: Kinda goofed by putting the solar panel on the least sunny side possible.
But, my parents love it! And I do too! <3
Subscribe to:
Posts (Atom)